How to Fix "Secure Boot Violation" Error in Windows
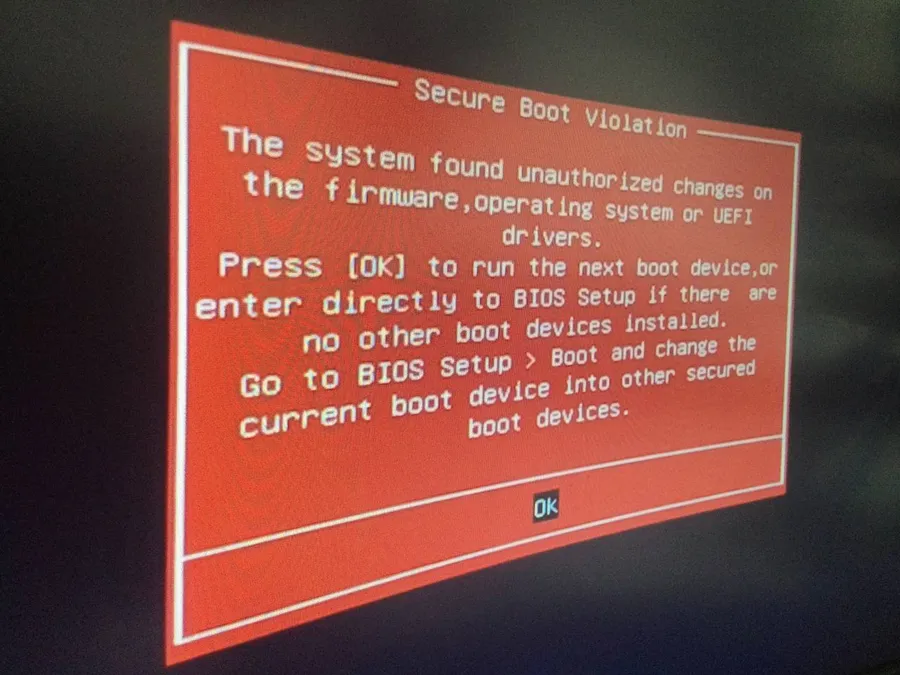
If you’ve recently updated Windows 11, cleared your motherboard’s CMOS, or tried to reinstall your operating system, you might have been suddenly greeted by a red box during boot:
Secure Boot Violation
The system found unauthorized changes on the firmware, operating system or UEFI drivers.
At ITGOIT, we frequently manage hardware deployments and troubleshoot boot failures for our business clients. When a computer suddenly refuses to boot and accuses the operating system of being "unauthorized," it causes instant panic.
Fortunately, your PC isn’t broken, and your data is likely perfectly safe. Here is exactly why this happens and how to fix it.
Why Does This Error Happen?
Secure Boot is a security standard developed by the PC industry to help make sure that a device boots using only software that is trusted by the Original Equipment Manufacturer (OEM).
When Secure Boot triggers a violation, it means the digital signature of what you are trying to load doesn't match the "Approved" list (the cryptographic keys) stored on your motherboard. This can happen for a few reasons:
- Malware / Rootkits: A virus actually did modify your bootloader (this is what Secure Boot was designed to prevent).
- Unsigned Drivers: You recently installed a piece of hardware or a low-level software driver that lacks a proper digital signature.
- Buggy Windows Updates: A recent update corrupted the boot configuration.
- The Most Common Cause (The 2011 vs. 2023 Certificate Mismatch): This is the culprit 90% of the time right now.
The 2023 Certificate Problem Explained
Microsoft updated the Windows 11 bootloader to be secured by a brand-new "2023" certificate.
However, many motherboards, especially those manufactured between 2018 and 2022, only contain Microsoft's old "2011" certificates in their factory defaults. When you accidentally reset your BIOS, or Windows fails to automatically push the new keys to your firmware, a mismatch occurs. Because the motherboard's 2011 keys don't recognize Windows 11's new 2023 signature, the motherboard assumes Windows is a virus and blocks it entirely.
To fix this, we just need to manually hand the new keys to the motherboard.
How to Fix Secure Boot (The ITGOIT Method)
You will need a working computer and a USB flash drive to complete this fix.
Step 1: Prepare the 2023 Certificates
You must download the new raw certificates directly from Microsoft and put them on a USB drive.
- Format a USB flash drive to FAT32. (Note: NTFS or exFAT will not work; the BIOS can only read FAT32).
- Download these three official Microsoft Certificates. (Right-click and select "Save As" if they open as text in your browser).
- DB Certificate: Windows UEFI CA 2023 (Save as
db2023.crt) - KEK Certificate: Microsoft Corp KEK 2K CA 2023 (Save as
kek2023.crt) - 3rd Party DB: Microsoft 3rd Party UEFI CA 2023 (Save as
db3rdparty.crt)
- DB Certificate: Windows UEFI CA 2023 (Save as
- Place all three
.crtfiles onto the root of your FAT32 USB drive.
Step 2: Inject the Keys into the BIOS
Insert the USB drive into the affected PC, turn it on, and press DEL or F2 repeatedly to enter the BIOS.
ITGOIT Pro-Tip: Ensure you are in "Advanced Mode" (usually F7). Before appending new keys, make sure you have first clicked "Restore Factory Keys" or "Install Default Secure Boot Keys" to populate your base variables! If your key sizes say "0", the new keys won't save.
For ASUS Motherboards:
- Go to Boot -> Secure Boot -> Key Management.
- Click KEK Management -> Append Key -> Select your USB -> Select
kek2023.crt(Format: Public Key Certificate). - Click DB Management -> Append Key -> Select your USB -> Select
db2023.crt. - Click DB Management -> Append Key -> Select your USB -> Select
db3rdparty.crt. - Go back to the main Secure Boot menu and change OS Type to Windows UEFI Mode.
For Gigabyte Motherboards:
- Go to Boot -> Secure Boot -> Key Management.
- Select KEK -> Append -> Select your USB -> Select
kek2023.crt. - Select Authorized Signatures (DB) -> Append -> Select your USB -> Select
db2023.crt. - Select Authorized Signatures (DB) -> Append -> Select your USB -> Select
db3rdparty.crt.
For MSI Motherboards:
- Go to Security -> Secure Boot -> Key Management.
- Ensure Secure Boot is set to Custom.
- Select KEK -> Enroll -> Select your USB -> Select
kek2023.crt. - Select DB -> Enroll -> Select your USB -> Select
db2023.crt. - Select DB -> Enroll -> Select your USB -> Select
db3rdparty.crt.
Step 3: Save and Reboot
Save Changes and Reset your computer.
Your motherboard now holds the correct 2023 Microsoft certificates. It will successfully verify the signature of the modern Windows 11 bootloader, and your system will boot perfectly with Secure Boot fully enabled!
Tired of Fighting IT Headaches?
Hardware quirks, firmware bugs, and Microsoft updates breaking system functionality are a easy fix for the technicians at ITGOIT.
While manual fixes like this are great for a single PC, deploying and securing dozens of workstations across an enterprise network requires a different approach. We build automated scripts, maintain strict standard operating procedures, and proactively monitor devices so that errors like this are resolved before they stop your employees from working.
Need hands-on help managing your company's IT infrastructure, server deployments, or workplace management? Contact the ITGOIT team today. We provide expert remote and on-site support tailored entirely to your business needs.
Related content
How to Automate Windows Installations (Bypass OOBE & Local Accounts)
Stop clicking through the Windows setup screens. Learn how to fully automate Windows 10, 11, and Server installations, bypass OOBE, and force local accounts using the free ITGOIT Autounattend Generator.